Science Explains What Happens to Your Body When You Do Planks

The plank exercise is a ridiculously simple yet amazingly beneficial endurance exercise that can help to strengthen and tone the core muscles of the abdomen, hips and back. With origins in yoga, planking is easy to do and can be adapted to provide benefits to even the most physically fit among us.
The Benefits of “Planking”
According to medical studies, planking is one of the most effective exercises for total-body health. More than just an ab exercise, the plank boasts several benefits for getting fit and staying healthy.
Planks help to tone the belly
Because the plank exercise engages all of your core muscles, they can tone and tighten your belly better than any crunch could ever hope to. This can also help to prevent ab muscles injuries such as straining or pulling of the abdominal muscles.
Crunches can only work a small section of your core, mostly focusing on the upper abdominal muscles. Planks, on the other hand, engage both upper and lower abs, as well as the obliques—so you can say “farewell” to those “love handles” that prevent you from having the trim and toned waistline you desire (no matter how many crunches you do).
Of course, to get a flat tummy you will also need to get rid of your belly fat as well and you can find more information about it in my eBook – Blast Your Belly Fat.
Toning the abs and burning off belly fat is only the tip of the iceberg when it comes to the benefits of planking.
Reduce and heal back pain
By strengthening your core muscles and tightening your abs, planks can help to take a load off your back muscles while simultaneously whipping them into shape.
For example one medical study found that core stabilization exercise (like planks) can greatly reduce low back pain. Another study concluded that core stabilization exercises like planks significantly reduced back pain by 76.8%.
Performing the plank exercise can help reduce back strain when you are at rest, so this benefit stretches well beyond the time that you are actually performing the exercise. To further strengthen your back and reduce back pain try these 13 exercises or these yoga stretches.
Improve flexibility, balance and posture
When you improve the tone of your core muscles, you can feel the benefits all over your body.
One medical study concluded that core exercises such as planks can improve range of motion and reduce pain.
Not only can the plank exercise build strength and reduce pain, it can also help to make your body more flexible, improve your balance and create better spinal posture, whether you are seated or standing. You can also try these exercises to improve your posture.
Easily modified for different fitness levels
Perhaps the best thing about planks is that they can be endlessly modified, so that people of all fitness levels can find the type of plank that is right for them.
Beginners can start with a basic plank position, and work their way up to modified forms that can challenge even the most athletic bodies (I will discuss a few variations that you can try in the video below).
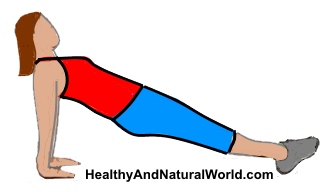
How to Do Reverse Planks Properly
Using good form is crucial when doing the reverse plank exercise. Here’s a video showing how to do a reverse plank.
Take a seat on the floor and extend your legs straight out in front of you. Place your hands on the floor, taking care to align them with your shoulders. Raise your body up so that your heels are resting on the floor and you create a diagonal line with your body.
Suck your belly button and keep your body as straight as possible. Continue to breathe and don’t hold your breath. Hold yourself in this position as long as you can, then rest. Repeat 2-3 times. Gradually extend the time of holding yourself in the position.
How to do Planks Properly
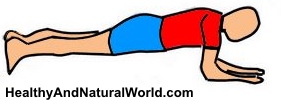
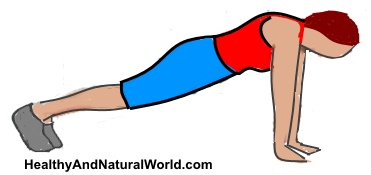
Using good form is crucial when doing the plank exercise. The good news is that doing a plank properly isn’t very difficult—it just takes practice and concentration at first. Here’s how to do a plank:
Suck your belly button and keep your body as straight as possible without locking your knees. Continue to breathe and don’t hold your breath. Hold yourself in this position as long as you can, then rest. Repeat 2-3 times. Gradually extend the time of holding yourself in the position.
- Lie flat on the ground, face-down
- Place your arms so that your shoulders are directly over your elbows, wrists aligned with elbows in a straight line (see illustration).
- Tighten abdominal muscles and gluteal muscles (the muscles which make up the buttocks) and hold the position as long as you can. Gradually extend the time of holding yourself in the position
- Rest for about a minute between repetitions
Avoid these Common Mistakes while doing Planks
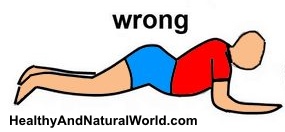
Although doing the plank exercise is not difficult once you know how to do it, there are some common mistakes that can decrease the benefits of planking, and even injure you. Be sure to avoid the following:
Mistake #1 – Do not allow your alignment to falter
Dropping your hips, head or shoulders during the plank can ruin your spinal alignment and cause injury. If you need a break, carefully come out of the plank position and rest before trying again.
Mistake #2 – Do not put your hands too close together
This puts stress and strain on your shoulders and can hurt more than it helps. Remember that your hands should be in line with your elbows, which should line up with your shoulders.
Mistake #3 – Don’t hold your breath
Breathing normally is important when planking, and you need oxygen for any exercise to be effective. Remember to breathe!
Mistake #4
Don’t hold the plank for too long—a little goes a long way!
Variations on the Plank
Incorporating physical activities into your daily life is one of the 70 habits featured in my e-book 70 Powerful Habits For A Great Health, and what’s good about plank exercise is that you can create different variations of it and make it at the comfort of your home without special equipment. Try a few of these variations as you become more experienced with planking:
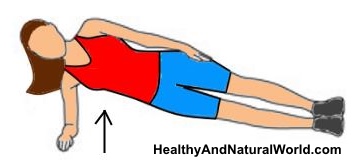
Side plank
Lie down on your side and place your forearm on the floor, then press your body upward. Your form should create a straight, diagonal line. Hold the position as you would for a basic plank, then repeat on the other side.
High plank
The high plank looks similar to a push-up. Instead of pressing up onto your forearms as you would with a basic plank, you align your hands with your shoulders and press up onto your hands, balancing on your toes, as though performing a push-up.
The 30-day Plank Challenge – Get a New Body
The 30-day plank challenge is something you may have heard friends raving about, and while there are several variations to this challenge, a common 30 day plank challenge is this:
Days 1-2: hold your plank for 20 seconds
Days 3-4: hold your plank for 30 seconds
Day 5: 40 seconds
Day 6: rest day
Days 7-8: 45 seconds
Days 9-11: 60 seconds
Day 12: 90 seconds
Day 13: Rest day
Days 14-15: 90 seconds
Days 16-17: 120 seconds
Day 18: 150 seconds
Day 19: Rest day
Days 20-21: 150 seconds
Days 22-23: 180 seconds
Days 24-25: 210 seconds
Day 26: Rest day
Days 27-28: 240 seconds
Day 29: 270 seconds
Day 30: 300 seconds
But before you join the plank party, you need to take a few things into consideration:
Bad form is bad news
These endurance challenge may well build stamina when done carefully and correctly, but bad posture during making planks is very bad news, so make certain that you are using good form when you plank. If your body tells you that it needs a rest, take a break rather than sagging into bad form—it could mean the difference between a healthy body and spinal damage or a torn muscle.
Plank responsibly!
If you are just beginning to work out, the allure of a quick, 30-day exercise challenge can be difficult to resist. However, fitness challenges should be used cautiously by people who are just beginning to exercise. If your core could use some work, try creating a custom “challenge” that works at a slower pace. This way, you can reap the rewards of planking without fear of injury.
Here is a video demonstrating plank variations:

